Showing posts with label hair. Show all posts

Monday, 13 July 2015

MOTHEROFCURLS: MY NATURAL HAIR JOURNEY

Hi, my name is Tyra Chuck, and just about all of my life, I have been told at some point or another, that I have 'good hair.' To the black community this typically meant that you had 'nice hair for a black girl.' Those two phrases went hand in hand. I mean, they were right wasn't they? I fit all the characteristics...the qualifying traits. I was mixed (Jamaican & Chinese) & had long hair. Growing up people, especially in school, made it seem preposterous, impossible even that there was no way you could be black, have long healthy hair & not have a relaxer! Wrong!

My 'Pre Relaxer Childhood'
Up until the age of 12, I lived a relaxer free childhood. My hair was thick, unruly & big... i'm talking Dianna Ross/ Mel B Scary Spice big. From looking at pictures, I observed my hair started off quite curly, but got thicker and more afro textured as I got older.

Like younger naturals, I dreaded wash day and my mum combing out my hair. I normally had to have my hair in plaits or cornrows, just to keep it neat and avoid my mum having to redo it so frequently. Back then there wasn't a lot of natural hair products that we have today, so rocking my hair in my 'natural state' out, wasn't even an option.

My mum was a working mum, so after some years she didn't have time nor effort to do my hair. That's when she gave me the choice to either get my hair pressed or relax it... 

My Relaxed Days


I chose relaxer. At the age of 12, I chose relaxer. Of course I didn't have the knowledge of what it did, but at the time it sounded promising. I was sick and tired of braids.

Straight hair all the time &no more painful wash days. Who wouldn't say yes! My mum's friend & hairdresser, who had been doing her hair and occasionally mine too, since my mum was pregnant with me, gave me my very first relaxer.

She used two boxes of no-lye texturiser from what I could remember. Yup, that's how much hair I had! My first relaxer experience was good, if I'm going to be honest. Apart from the almost tingling/burning sensation on my scalp and long hours in the chair, it was fine. She washed it, deep conditioned it, blow-dried it, trimmed it, and straightened it, the whole works! The change took some getting used to, but I got a lot of compliments. I got my hair relaxed every 2+ months up until the age of around 16. 

At first, I didn't have much knowledge on maintaining and caring for my relaxed hair-other than tying it at night and moisturising my ends. Within that same year, I thankfully discovered YouTube. People were actually posting videos on how they took care & styled their hair. It wasn't until I discovered Ulovemegz  (a beautifully relaxed & healthy youtuber) that I really started taking care of my relaxed hair. She was literally my relaxed hair goals.
 
From her I learnt about growing relaxed hair, deep conditioning it, stretching your relaxers and so much more. I could then maintain my hair easier in-between touch ups & experiment with different hairstyles. At one point I even had a full fringe.

The Good, Bad & The Ugly- Transitioning
 
One thing I didn't like about my relaxed hair, was the regrowth. It felt uncomfortable. It looked weird, and a part of me would always wonder how the little curls at the root, would look on my whole head.
Having relaxed hair, I discovered how fast my hair actually grew. And let me tell you... it was quick. There was a few other downsides too:

1. New Growth
2. The expense
3. The whole relaxer process/upkeep
4. How my hair looked wet
5. Breakage (which didn't occur so much until the end)
My last relaxer was around July 2013 (Prom). After that I was to say enough is enough, and call it quits with my bra strapped relaxed hair. That same year, in September I rocked a u-part wig while transitioning (see pic on right).

I found out what 'transitioning' was (growing out your relaxer) from my research on stretching out your relaxer, on YouTube. I looked at other people's 'Hair Journey' & 'Transitioning from Relaxed to Natural' videos for tips, advice, motivation and inspiration.

Back to Basics- 'My Natural Hair'
Going back natural was not easy. It was frustrating, unexpected and surprising all at the same time. The hard part was finding a style to which I used minimal heat. At first I tried a lot of braid outs and twist outs on my transitioning hair, but I just didn't feel comfortable. I hated having to deal with the two battling textures. Instead, I decided to opt for a easier protective style that required less maintenance- weave, wigs & box braids. I did this until I got to a comfortable length to do a 'mini big chop' around Feb/March 2014.


YouTube in general, but mostly the above YouTubers have been really helpful while on both my transitioning & natural hair journey now. Check them out!

Natural Hair Freedom- What next?

Like I said on my previous blog post ,since being natural I have experimented with protective styles, length and even got a side cut. One thing I have learnt about my natural hair journey hair is 1) Have fun with it 2)Healthy hair over length. Recently I have been having some heat damage issue, which is not so sever I have to big chop, but guess what...I kind of feel like it anyways. I've never had a 'twa', so...maybe soon I will.

I know this post was long, but thank you for reading & hopefully you found it useful. Feel free to ask me any questions. All social media links below!

Twitter @Tyrachuck12
Instagram @Tyrachuck12
Pintrest @Tyrachuck12
Tumblr: allthingstheculture.tumblr.com


Wednesday, 8 July 2015

THE #CUTLIFE: MY SIDE SHAVE EXPERIENCE


Famously sported on celebrities such as Rihanna, Cassie & Ellie Goulding, by now you must have heard about the side shave epidemic ...or be living under a rock! With that being said, like most of the hairstyles I spontaneously go for, either inspired by a celebrity or something on my Pintrest feed, I decided to take the plunge and experience this bold hairdo.

My Experience- Before
Before even being 10ft near a razor or a barber shop, I decided to thoroughly do my research on the style of my desired side cut. Did I want it to be simple? Did I want a pattern? How much will it cost? Am I going to do it myself? Barber? Did I want it on the left side of my head? Did I want it on the right? These were just a few questions I asked myself when constructing the exact way I wanted my side cut. Whenever you do something as bold as cutting off one side of your hair off, it is really important to think and research on what it is you exactly want. This being fairly obvious, because once you start chopping, there's no going back.

I looked at pictures. I also watched Youtube videos on people's tips & experiences on getting their side shaved as well as how they maintain it. This may be something you want to consider before diving into the cut life. I wanted mine on the left side of my head, to just behind my ear. I even sectioned this area back before I cut it & rocked a faux hairdo bobby pinning it back to get a confident look and feel of how my side cut will look on me. You could even try doing a braid instead to get that faux side cut look.


My Experience- During
I went to my local barber shop to get my side cut done. Both of my brothers got their hair cut there, so I knew it was a reliable and affordable choice. It only cost me £5. I went with my younger brother for 'moral support', but I wasn't nervous. Not even when the barber continuously asked me if I was sure I wanted to do it. I sectioned off the area I wanted cut before he started and clipped the rest out of the way. I got it cut down to a level 2.

My Experience- After
After I got my side cut, I felt kind of liberated. A lot of people, especially females, take a lot of pride in their hair so for me I felt really empowered and care free after- despite cutting off a whole chunk of my hair. I got a lot of compliments on my cut, and still do till this day. It's been nearly a year already! The cut puts a twist on any ordinary hairstyle; be it twist outs, straight hair, braid outs, box braids or even a sew in (which I am planning to try in the near future). I get my hair cut every 2-3 weeks down to a level 1, only because my hair grows quite fast. So with that said, for me, it is a quite a bit of maintenance.I go to the same place and person for the same price I first got it.

I hope this post was helpful, make sure to check out & follow my Instagram for pictures of how I style my side cut. If you have any questions or want me to post anything specific in the future- COMMENT DOWN BELOW! All social media will be listed below :)


Twitter @Tyrachuck12
Instagram @Tyrachuck12
Pintrest @Tyrachuck12
Tumblr: allthingstheculture.tumblr.com


Saturday, 30 May 2015

BOXSPIRATION

Top 5 Celeb Box Braids

So I've recently gotten box braids...again! I decided to get them just to give my hair a break from when i straightened it, and sadly but surely got a girly girls biggest nightmare- some head damage! Don't worry, i made sure to trim those little bad boys off, so my hair is back on it now. I just want to give my hair a breather, and hop back onto this low maintenance retro style bandwagon in order to reboot my curls. Plus, since exam season has kicked in and ain't nobody got time for up keeping natural hair.

Never the less, I've complied a Top 5 list of celebrity box braid queens that have been inspiring me while on this box braid venture. This time round I opted for long waist length box braids with a medium thickness. 

Check out my Instagram to see pictures on my rocking my box braids, and how I've been styling them.

Comment Below! What celebs have you liked rocking box braids?

Tyra x

Twitter @Tyrachuck12
Instagram @Tyrachuck12

Friday, 27 March 2015

Product Pickups


Hiya! Just showing you a few hair products I purchased today.

I was running low on nearly all my hair products so decided to pick up these beauties. All products cheap and below £5! 

Comment below and let me know if you have tried any of these products & if they worked well for you.

Make sure to follow me on social media for updates on my blog, all things hair related or just my day to day life.

Tyra x

Twitter @Tyrachuck12
Instagram @Tyrachuck12
Tumblr- allthingstheculture.tumblr.com

Sunday, 8 March 2015

Healthy Hair: From The Inside Out


Welcome back everyone! I know, I know... I haven't posted in a while. I've been really busy with school, but during my little hiatus ive been back on my A game-getting my health, fitness & diet in check. 

This may be a bit of a side step from my usual hair posts, but really, having healthy hair isn't just about the products you use. It's about nurturing your body and treating it right. Your diet, and the things you eat play a big part in the health of your hair and its growth. I've been natural nearly 2 years now, and I've come to the point where I'm not really concerned about the length of my hair anymore. It's healthy hair over everything. What point is it having a head full of hair if it's just being limp, lifeless, broken and broken? 

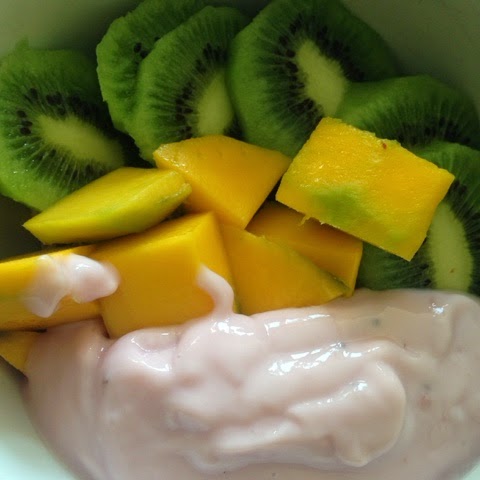
Below, is a food dairy if you like, of a few healthy things I've eaten this week. I didn't take a pictures of every single meal, but these are just a few pictures I've added into my regime to give you a rough idea. 

Lunch: Diced spam, sweet potatoes, spinach, tomatoes, apples & kiwi salad.


Strawberry Onken ft mangos, grapefruit & oranges.


As you can probably tell... I like fruit bowls. They're a quick, easy & you can get creative and add whatever fruit/toppings you like. Try it out!


Make sure to check out Youtube, Instagram & Pintrest for inspiration and ideas for healthy snacks and meals! It really helped me, so i don't see why it wouldn't help you!


I hope you enjoyed this post and found it helpful. Hopefully, it will kick start your journey to healthy hair aside from the hair products you use.

 
Comment below if you have any questions & make sure to click the links below to keep up with my healthy hair journey. 

Tyra x 


Twitter: @tyrachuck12
Instagram: @tyrachuck12
Tumblr: allthingstheculture.tumblr.com


Sunday, 15 February 2015

Starting Line Up: My Wash Day Essentials

Today's Wash Day Featuring: 


Dr Miracle Clenaing Conditioner 
TRESEMME Vibrant Naturals Conditioner 
Shea Moisture Curl & Shine Conditioner 
Maccadamia Deep Repair Mask 
 

I cleanse my hair once a week with these products, so I guess you can call them my wash day essentials. All these products I use regularly, have really helped in resorting and strengthening my curls on my no heat hiatus. 


Comment below, or tweet me a pic of your wash day products. 

Twitter: @tyrachuck12
Instagram: @tyrachuck12
Tumblr: allthingstheculture.tumblr.com


Saturday, 7 February 2015

January Favourites


Say hello to February, and bye bye to January! I cannot believe we're already this far into 2015, but no worries- that just means I get to share with you, all the lovely products I've been head over heels through out the month of January! Hope you enjoy :)

Maccadamia Deep Repair Mask|
First up is the Maccadamia Deep Repair Mask! I mentioned this in my previous blog post ( check it out if you haven't already). Three words: repair, hydrate and restore! This thick mask goes above and beyond in repairing my hair. I have used it about 3 times since purchasing it, and each time I've seen a difference in my hair. My hair feels a lot stronger and softer. I use this product about once a week. I put this throughout my hair after I wash it. Detangle. And then put on a plastic cap, to let it sit for 20-30 mins before rinsing it out. I will definelty be using this product throughout these next few months. The best deep conditioner/mask I've used so far! 

Joico K-Pack Smoothin Balm | 
This is my first time using this hair brand, but I have to say I'm very impressed. The smoothing balm came in a sleek gold packaging with a generous amount of 200ml, which will last me a while because I don't always wear my hair straight. I find I reach for this product now whenever I put any kind of heat on my hair. It helps minimise my frizz a lot and keeps it smoother for a lengthy time. A really good top quality product, that is not super expensive. 

I know it's not a lot, but these are two products that I have frequently used and have honestly been working for me lately. 
Remember: it's quality, not quantity! 

Comment below some of your January Faves, & I'll might try them out! 

Tyra x 

Follow me on: 
Twitter: @tyrachuck12
Instagram: @tyrachuck12

Monday, 26 January 2015

Huge Hair Haul

As you can see from the heap load of pictures, I have purchased a lot of hair products over the course of these two months. Lately, I've really been on the hunt for hair products to add into my hair regime, that really nourishes and improves the state of my hair. I get asked a lot of questions about what hair products I use on my hair, and these are the ones that have been working for me lately. I've been really slacking on staple hair products since going natural in 2014, but these following products have reassured to be some definite keepers! I've given a mini review on each product too! 

In comparison to the Coconut Hibiscus conditioner, I do not use this curl enhancing smoothie quite as much. Never the less still an amazing product that gives my hair lots of slip, easy to detangle with and leaves my hair defined and smelling delightful. Thumbs up for hair products that work as well as they smell !
Ah. My trusty Shea Moisture Conditioner! A curly girl or naturalista must have. From the moment I put this beautifully scented, coconut and hibiscus product on my hair, my curls have been soft, frizz free and moisturised. I assure you that, a little defiantly goes a long way with this hydrating product, and it's pump applicator feature has to be a definite plus. This makes it so easier for me to apply when in the shower or doing a wash & go.
Have heard a lot about this foaming wrap moose. Not yet tried it but I will most likely post an update on how it worked on my hair, when I either roller set or flexi rod my hair. Wish me luck!
 I purchased this conditioning edge control for just £2.49, and was definitely a good cheap find. This product, like most of the products I use, smells great and does a good job at smoothing down my baby hairs. I would say this product has a good but not super hold, on my edges in comparison to my eco styler olive oil gel. It just doesn't hold as much! Apart from that, this edge control is good on the pocket, and does not leave my hair sticky or hard.
 You have no idea, how ecstatic I am to have this product. I've been wanting to get my hands on this miracle product for years, after always seeing it floating around YouTube. With that in mind, you can only imagine how  over the moon I was when I received it. I purchased the Macadamia Deep Repair Mask (for dry & damaged hair) on sale at feelunique.com , so I was able to reduce the products worth it, but expensive price tag of £12.75(100ml) down to a reason £9.20. I've only used this once so far, but after using it my hair felt super soft, shiny and moisturised. I promise you, this product is really as good as everyone says!


Creamy Olive Oil Deep Conditioner I used to use back when I got my hair relaxed. Still successfully brings my hair back strong, healthy yet soft.
 This smoothing balm does a brilliant job at protecting my hair when heat styling, as well as combatting frizz, which I find to be a common problem amongst all hair types- more so curly and natural hair. I apply this directly to clean, damp hair and blow-dry, in order to achieve intense shine. This product makes straightening my hair really easy, and holds up in the humidity of this crazy British weather. I really have nothing negative to say about this product, and would love to try out the rest of the line. Comes in a generous size. Also purchased from feelunique.com
This intensifying Argon Oil conditioner by Cream of Nature, is a conditioning treatment I switch in and out of. I find when I use this I get less breaking and shedding, so it obviously must be doing its job in improving the strength of my hair. I don't leave this on for too long. Only for 15-20 minuets.
My co wash go to product! I find Tressemme products work wonders on my hair! Very inexpensive and will last you for a very long time. I have a tressemme shampoo this big, that I got during the summer, and it is yet to be finished. The nourishing conditioner has so much slip, so it makes detangling my hair a breeze. I would highly recommend this product. 
I'm not really one to care too much if my hair products are sulphate free or not, however this product is definitely a sulfate free shampoo that has impressed me. Although it's sulphate free, after shampooing once, this conditioning shampoo comes a good lather. I don't know what it is in this shampoo, probably the jojoba oils, but the smell it is very strong- minty almost, so some may not be able to put up with the strong scent. Never the less, this shampoo combats any build up from products and leaved my scalp fresh, and my stands conditioned.

 
I hope you enjoyed this hair haul/ mini review & fount it useful.
Comment Below! What are some of your holy grail hair products?

Tyra x


Tuesday, 9 September 2014

Change of plan

As you may already know, in my previous blog post, i talked about my conflicting thoughts to either dye my hair a rich brown or burgundy red colour. Due to my typical indecisive ways however, I've decided to unfortunately.... do neither! Well for now anyway.

My initial idea was to dye my full head of hair using a demi permanent hair colour from ion colour brilliance, in the shade medium burgundy blonde. Along side this daring idea, i was to follow the advice from an amazing tutorial by natural hair blogger and Youtuber Moknowshair ( you guys should defiantly check her tutorials out).In the video she took me through the process and steps of what demi permanent hair colour is, what to consider before dying your hair, and also what the application process requires. If you are considering colouring you hair at home, i would advise you to check out her video to see if colouring your hair is the right thing for you to do.  

Why did I change my mind? 

1. Hair Porosity- What is hair porosity? In a nutshell, i think the best way to define hair porosity, is how your hair absorbs and attains moisture. There are mainly 3 types of hair porosity (low,medium & high porosity), and you can find out which one you, are by doing a hair porosity strand test

I myself took the hair porosity strand test, and found from this, my hair is low porosity. This means my hair, although very shiny, suffers from build up quite easily. This is because hair cuticles are tightly bound, so when doing things such as colouring hair, it may be difficult to achieve the desired colour on the box. This was clearly evident when i took a strand test myself, and the colour did not take.I think if i am to colour my hair in the future, i will seek professional help and advice at a salon to guide me to my desired look. 

So what now?

I'm still considering colouring my hair, however 'what colou?' i do not know. A low maintenance hair colour would be ideal as the upkeep would be less expensive, but whatever i choose to do I will defiantly seek expert and professional help. 


Tyra x


Tuesday, 5 August 2014

Catch Up & New Hair Colour?

So I know its been a while, but I'm finally back with an update. I just finished school a month or so ago, and at the moment I'm currently five hours away, on holiday in Miami. I've been here for almost 3 weeks now and I'm sorta kinda getting used to it. With that being said, I've still got 3 weeks left, and although I miss my friends at home, I'm looking forward to these final weeks because I know I'll be complaining how much I miss it when I'm back at school.
Anyways...I know Autumn/Winter is right around the corner and like always, I'm looking to try a new hairstyle and/or colour. An additional reason to this new thought, is that I'm going into a new school year and just want a different look. So far, I'm caught between a chocolate brown colour, and a rich red/burgundy colour. I've been going back and forth with a decision; one minuet red, the next brown, so I'm not too sure what to settle on. On one hand, the chocolate brown is less drastic but gives me suttle colour change however the red/dark burgundy type tone looks like it could be more flattering on my skin tone, while adding a fun pop of colour.

 I've gone red before (way back last Christmas) but that was more of a bright, courageous red. This time around, whatever hair colour I choose, I'm looking to play up with the darker hues to delve into the deeper tones of the season and the fashion and makeup trends it brings.  


I'll try put up a new post when I finally go through with dying my hair, including the items I used and what I did to get it to my final colour. Fingers crossed all goes well.

See you somewhere on the internet,

Tyra x

Saturday, 21 June 2014

Hair update: So I cut my hair...

So since I've cut my relaxed ends off, my hair had been disgustingly uneven. The main reason of this being from me cutting it myself, and not professionally. A lot of transitioners when doing the big chop at home (cutting of their relaxed ends) can relate to me on this one, so I decided to book a appointment at my local hairdressers. Just a trim and layers. Nothing too major!


Now cut into layers, and evened out, my hair has a lot more bounce, movement even though in the shape of a bob. Cutting your ends dosnt have to be a bad thing. I know a lot of you girls want to hold on to that length, but there's really no point if you have long hair that is damaged, split and fried. Your hair is most manageable when the ends are in good condition. Many of is hold onto every centimetre of length we retain, but damaged ends can do more harm than good. Everyone,no matter if short or long hair, should strive for one main goal: healthy hair! 

Tip: I would advise trimming your hair at least every 3-4 months just to keep your hair in tip top condition and retain length.  

Wednesday, 4 June 2014

90's Box Braids


We've seen them everywhere! Instagram, Twitter, Tumblr and even on celebs from Janet Jackson to Beyonce and Keri Hilson. No matter where we see it, there's no escaping the 90's nostalgic box braid trend. Now. I've recently given into the box braid craze again myself (this is my 2nd time) , and can't help but fall in love again with how low maintenence and easy this protective style really is. If you want a no fuss, time saving hairstyle this fun, retro hairstyle is definitely for you! Here's a few tips on how to maintain and care for I've picked up along the way.


1. Cleanse that scalp

I know, i know. I find it tedious too, but you still need to cleanse your hair while in this box braid style! As easy as it is to get lazy and not do it, once in a while ( at least once a week) you have to clear away all that dirt and product build up. You still want you hair to thrive and grow in this protective style right? Opt for a light weight or sulfate free shampoo. I use Tropic Isle Living all natural black castor oil shampoo. With a combination of black castor oil and Shea butter, these essential oils really help gently cleanse, condition, restore moisture and promote a healthy scalp to grow my hair. 


2. Moisturise your stands 
Speaking of moisture, it essential you keep you keep your hair moisturised or else it can dry up and break off. I think this is one step that most people forget about, but I promise you it is one of the most important steps if you want to see an improvement in your hair when your finally take your braids down. My favourite is African Essence control spray (for human & synthetic hair). This fantastic product is a 3 in 1 so moisturers, conditions and adds sheen to my hair all at once. I use this around twice a day to really keep my hair moisturised. 

3. Be gentle when styling 
Pulling too tight on your braids during styling can put a lot of strain on your roots. By pulling too tight or being too aggressive when styling your hair, it can potentially  cause your hair stands to be pulled out. Always think of your hair as being like a fine piece of silk- be very delicate with it. And lastly make sure when you are styling your braids, you gently tie it up with a non snag hair band to avoid breakage. 

Hopefully these tips were helpful! :)


Template developed by Confluent Forms LLC